Pages

Showing posts with label vegan. Show all posts

Wednesday, November 16, 2011

Sweet, Sour and a Little Bit Hot: Stir-Fry Cabbage and Greens with Sesame Seeds

In an attempt to get my refrigerator cleared out, in preparation for stuff I'm acquiring, cooking or baking for Thanksgiving, I considered the head of red cabbage and a bag of pea greens in my crisper. Generally, I use cabbage in the fall and winter versions of Spoon Salad and I like to finely chop up pea greens as an add-in, but I knew I was not going to get to that in the next few days.

I also had some, garlic and ginger. Add soy sauce, rice wine vinegar, sherry vinegar, agave nectar (alternately use honey), chili garlic sauce, sesame seeds and a little sesame oil and you can make a slightly sweet, sour and a little bit hot stir-fry. I also had some previously baked, marinated tofu cubes that I sliced up to add as a protein. For a prep-junkie like me, all the slicing, dicing and mincing is a rush but for those of you who don't get happy goosebumps at the thought of that, your pay-off is that the dish cooks in about 15 minutes.

This isn't so much a recipe as an example of really using the pantry, the spice cupboard and the crisper and winding up with something good. All sorts of substitutions can be made - from the type of cabbage or greens to the basic seasoning and liquids to the nuts. I really wish I'd had some cilantro, or chives and green onions, and I absolutely recommend those additions.
Pea greens, not to be confused with pea shoots which are more like micro-greens
I used pea greens - because that's what I had - but would recommend using another type of greens in this dish. When you quick cook pea greens, the vertical fibers of the (essentially hollow) stems, while pretty tender raw, do not break down. I occasionally buy pea greens and have always used them raw in salad, removing the tendrils and then chopping them up. If I did use them again in a dish like this, I'd pre-steam them in the microwave (sprinkled with a little water in the covered bowl) until they were wilted, but not completely cooked, and then chop them up very fine. De-stemming pea greens is kind of a pain and unlike chard or kale, the stem is not less fibrous as you move up to the top of the stalk.

Fortunately there are pages and pages of types of greens you can use, or you can leave them out. For the greens that have a slightly longer cooking time, you may wish to steam them in the microwave so that they are half-cooked and ready to finish off in the stir-fry.

If you're working by hand, it's easiest to thinly shred cabbage by separating some of the outer leaves
from the inner fold-y leaves. Flattening the outer leaves, placing them curved-side up
makes them easier to cut in long, crosswise strips.
I'm not including the recipe for the baked, marinated tofu (yet) but just about any protein would do whether vegan or omnivore: left-overs from your home-cooked, or a good purchased roast chicken, or pork, thin-sliced steak, etc - you get the message, yes? After the high-heat stir-fry and short braise in the liquids, the cabbage doesn't taste at all cabbage-y. It's tender but with a little residual crunch. It could be served on its own, or over rice or noodles.

Sesame seeds: from raw and white to toasted and caramel-colored, in the microwave. If you want to burn sesame seeds, it's dead easy to do so cooking them on the stove-top. You have to work harder to ruin them in the oven, but it can be done. I found that toasting them in the microwave removes the agony of defeat and acrid smell of burned seeds when cooked on the stove-top, but is the easiest (for me) if I actually want a tasty batch of toasted sesame seeds. You still have to pay attention to them but the whole process takes 5 or less minutes, depending on your  microwave's power and the transition from "almost toasted" to "perfect" is a little easier to control. On the other hand, if you've never had a problem toasting them in the oven or on the stove-top, I salute you!

RECIPE: HOT AND SOUR STIR-FRY CABBAGE and GREENS with SESAME SEEDS

Thursday, October 20, 2011

Green Bean and Almond Soup and Notes on Vegetable Stock


This recipe was part of my "cook the pantry and the crisper" effort this week. After making two cakes with almond flour, I had a surplus. I also had a just-passed-prime, but still in great shape, pound of green beans. Searching "green beans" and almond meal". I found this recipe on Clotilde Dusoulier's "Chocolate & Zucchini" site. Ms. Dusoulier adapted this recipe from "Breakfast, Lunch, Tea: The Many Little Meals of Rose Bakery".

Although not as pristine as when i bought them, these were super crunchy and fresh tasting.
It's a pureed soup of green beans, aromatics and vegetable stock thickened with ground almonds.  Green beans and almonds taste great together and using ground almonds as a thickener is a win for the gluten-intolerant. The resulting texture isn't silky smooth as most pureed soups, but the combination of flavors is very good. It's not a BIG! GIGANTIC! flavor-buster soup, but not everything has to be - just great ingredients and a lovely flavor. I ate this with salad and cheese toast.

In my version, I use leeks instead of onions and celery with no carrots (as there were none in the crisper). I prefer leeks over onions in a lot of soups and love the flavor. Leeks can take some cleaning, as there can be a lot of dirt in between the layers but I generally clean dirt of of the outside, trim off the ends, and the fibrous dark green parts (which I save for stock), cut them as called for and then wash them by soaking and swishing them around in cold water, letting them sit  for a couple of minutes to let the dirt drop to the bottom of the bowl then drying them off in a salad spinner. This method is easy and fast.
In most instances, I trim and cut up my leeks and then I wash them.
Just remember to clean your board and knife before moving on to the next vegetable.

Vegetable Stock: I cooked both wild rice and barley this week and used the left-over water as a basis for vegetable stock. Water in which I've cooked chickpeas also make a really tasty starter for stock. To that I added the green tops and trimmings from the leeks, some celery leaves, a bay leaf and a few stems of thyme. During the week I throw appropriate (where the veg isn't too strong-flavored or bitter and would overpower the taste) trimmings into a freezer bag and stuff it in the freezer. I don't use them if they've been in the freezer over two weeks.

The cooking water from many beans and grains - if you don't use it in the dish for which you cooked them - make a good base, too. White or light-colored beans - especially cannellini - tend to be good. I don't use bean cooking water when the resulting product is strongly colored or too cloudy. I let the left over water from the barley sit for about a half an hour and let the starch particles sink to the bottom while pouring off the less-cloudy water.

Vegetable Stock Guidelines: Heat up a big pot on the stove on medium-high. Add a couple of tablespoons of olive oil. Throw in the left-over vegetable trimmings that you have cut up roughly (the smaller the better) and a couple of pinches of salt. Depending on your preference, cook them without coloring them or caramelize them a little, adjusting the heat as necessary, along with 1 or two smashed cloves of garlic. Add a bay leaf, a few pepper corns, a tablespoon of tomato paste (if you have some) and cook for a few more minutes. Add half-dozen sprigs of parsley and a few sprigs of other herbs (if you have them). Add the left-over bean or grain cooking water, or just water to a ratio that works for the amount of vegetables and trimmings. Commonly, a pound of vegetables to a gallon of water, but adjust down (or up) depending on your vegetables.

Bring the pot to a boil, turn the heat down and cover so that the liquid comes to  a medium simmer. Let this cook, covered, for 45 minutes to 1 hour. It doesn't help this to cook it longer and by 1 hour, you've extracted the maximum flavor from the vegetables. Take off the heat and allow the stock to cool to lukewarm. Set a large strainer over a bowl and ladle the solids into the strainer (pushing down on them a little to extract so that you can pick up the pot and pour the remainder of the liquid through the strainer. Push down on the remaining solids a little to exact any extra liquid.  Allow this to sit for an hour or until completely cool. Pour this liquid, making sure that any sediment remains at the bottom of the bowl, through a double-layer of cheesecloth.  Cover and store in refrigerator for 2 days or in an airtight container (or multiple containers, in smaller quantities) in the freezer for a couple of months.
(LEFT) take the pan off heat when the almond meal is about this color. Have a plate ready (to cool it down)
because it will continue to cook. (RIGHT) Toasted and un-toasted almond meal comparison.
RECIPE: GREEN BEAN and ALMOND SOUP

Wednesday, September 28, 2011

Roasted Eggplant in Coconut Curry Sauce

This dish is aromatic and light with some warmth, but definitely not hot.  I found it to be real comfort food. There are three parts: the coconut milk infusion, the curry paste and the roasted eggplant. You can serve this family style, on a platter, or on individual plates.

I didn't have the kaffir lime leaves called for in the original recipe and substituted lime but if you can get your hands on them, they are wonderful. The kaffir lime has sort of a double leaf and in recipes each half is generally considered to be one leaf. You can find them frozen or dried. I have read that if you use dried, double the quantity called for in the recipe.

Lemongrass. Left: prepared and ready to use
Lemongrass. Native to the Philippines, it is used widely used in cooking as an herb or tea. It has a highly aromatic citrus taste. It's pretty easy to find these days in some grocery stores and farmers markets and definitely in Asian markets. It freezes very well. To prepare, remove the tough outer leaves. Cut off about 1/3" at the root end. Cut off any of the top that doesn't give a little when you stick a fingernail into it. Remove a few layers of the tough outer leaves. From that point, there should be about 3-4 inches of stalk to use. Bash the remaining stalk with a meat tenderizer (or something similar) with gusto until it breaks down, then prepare as called for in your recipe. You'll want a sharp knife for mincing the bashed up stalks. Even with the tough bits removed, they're quite fibrous and the smaller you mince them, the better they will break down when you make the curry paste.

If you are freezing it, slice thinly (before bashing) and store in small plastic bags from which you have removed all possible air. I store mine in a 'snack sized' zip-close bags and just break off a chunk - it will defrost quickly - then seal the bag again. I  write the amount (number of stalks) of lemongrass on the plastic bag so that I can figure out what volume to remove when a recipe calls for a number of stalks. Fresh is best and freezing any aromatic will lessen its intensity, so use a little more if you're using frozen.

Coconut milk can generally be found in regular and 'light' versions. I can't remember the last time I used full-fat coconut milk in a savory dish. The 'light' versions have about 60% less fat and using it does not seem to negatively affect the dishes I've cooked.

This dish calls for Japanese or Italian eggplant. Long and generally about 2" or less in diameter. Make sure you don't slice them any less then 1/3" (and up to 1/2 inch) thick. They should be soft after roasting but if they're too thin, they'll break down.

The amount of sauce will be generous. After you serve, set some on the table to pass around. It's good. Since it is not over hot, this works as a side dish to spicier/hotter dishes or as an accompaniment to grilled meat, poultry or fish. I ate mine with some grilled, sliced marinated tofu.

RECIPE: ROASTED EGGPLANT IN COCONUT CURRY SAUCE

Monday, September 19, 2011

Spicy Chickpeas: a Riff on Chana Masala

I dip in and out of Indian cooking and I can claim no expertise but I love the little I've learned about it. I absolutely love what happens when you combine spices and together they become a whole (taste and aroma) yet maintain an individual presence. While I've found good commercial blends, combining from scratch when you have the time - especially with whole spices - is so much better. The -several- recipes I referenced as a base for this dish were titled "Chana Masala". "Chana" (or chole) are chickpeas (garbanzo beans) and "masala" is a term used in Indian cooking -- there are many regions and types so I feel okay generalizing -- referring to a mixture of spices, often dry roasted, or a spice paste.
Draft 2 - with some cooking notes. More changes were made.
including leaving out the last addition of fried mustard seeds
at the end as I really didn't think it added enough
to go to the trouble.
I've seen references to Chana Masala in the regional cuisines of Punjab, Gujarat and Rajasthani. Most refer to the dish being fairly dry (not goopy or soupy) and being served with a fried bread ("bhatoora"). The dish is easily eaten out of hand with bhatoora. In my take on this it isn't completely dry, but far short of soupy.

Also, poblano chiles. Yeah, I used poblanos and they're definitely not used in Indian cooking. I really liked the idea of the slightly smoky flavor of roasted poblano in this dish and I have several in my refrigerator right now. One of my favorite vendors at the SF Ferry Plaza Farmers Market is Catalán Family Farm and they have some of the most beautiful chiles this time of year, as well as a bounty of heirloom tomatoes and other vegetables.

One thing I didn't have on hand that I saw in all my references was amchoor (or amchur) powder - a powder made from dried, green mangoes. I've had green mango salads in Thai restaurants and there's a slight sour-sweet taste that I'm guessing is enhanced in the dried version. Without amchoor powder, I substituted lime - adding the zest of 2 limes to the dish while it was cooking and the juice (about 3 tablespoons) at the very end of cooking, when the pan was off the heat. I don't know how comparable the flavor is, but I was happy with how the limes worked with the dish. A little sweet, a little sour and a slight hint of acid was a great contrast to the aromatic, smokey, spicy and medium heat of this dish.
When the mustard seeds start popping, be ready with the onions, otherwise the mustard seeds will jump out of the pan.
This dish is great as a side or as an entree. I ate it again tonight as a side with some left over roast chicken from Friday's dinner.


RECIPE: SPICY CHICKPEAS INSPIRED BY CHANA MASALA

Wednesday, September 7, 2011

Snack Time: Spiced Roasted Chickpeas

Snack? Salad topping? Soup or hummus garnish? They all work. This is the best method I've found to roast them without a lot of oil and still be very crispy. This batch of two cups calls for just 1 teaspoon of olive oil. The spices are up to you but I recommend that you go easy on the salt. Taste after seasoning. If you're too conservative, you can always add more after second pass in the oven. Just make sure you season them while they're still hot. Because the size of the chickpeas will vary, there may be a few that brown 'more aggressively' (the polite way to say, you might get a couple that look burned) than the rest - just pick them out. I found about 5 in this batch. Keep an eye on them during the last 5 minutes, after they've been seasoned.

How you choose to season isn't limited to any particular spices. Just be careful of things that might easily burn, like herbs. The next batch I make are going to be seasoned with chipotle powder. Or maybe barbecue. Salt and vinegar?

RECIPE: SPICED ROASTED CHICKPEAS

Tuesday, August 30, 2011

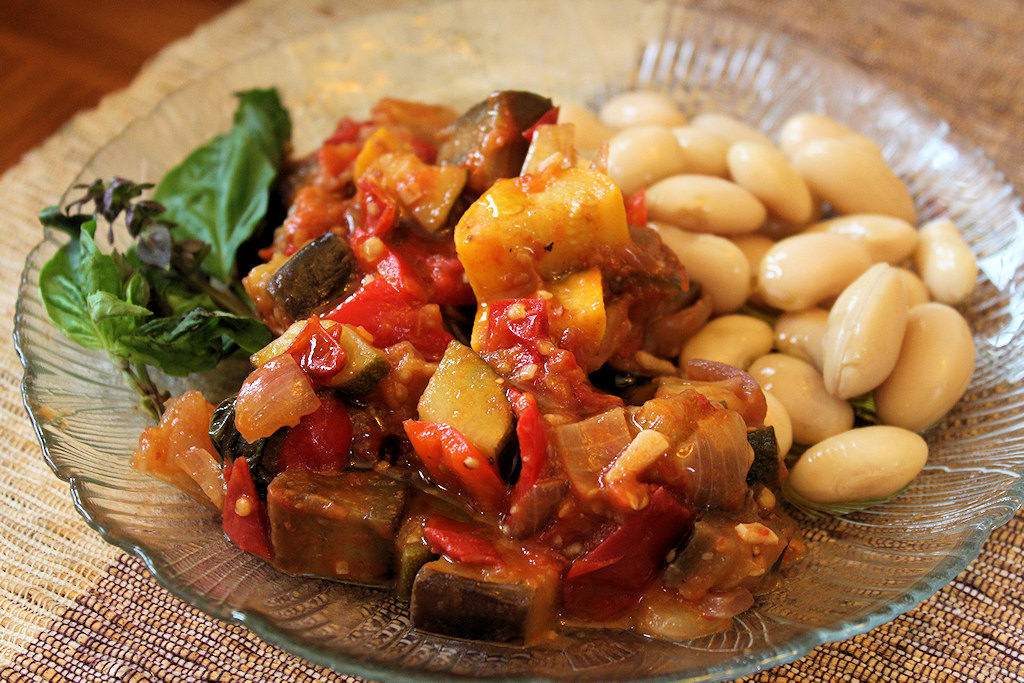
Ratatouille: Or, How I May Be Losing My "I Hate Zucchini" Membership Card

First it was Sautéed Julienned Zucchini. Then it was Zucchini Tomato Slaw with Tennessee Mustard Dressing. Now, Ratatouille. What is wrong with me? I can understand the first two - the first is flash sautéed and the second uncooked with the oh-so-offensive seed cores unused, but ratatouille is, by definition cooked, and for quite a while. For this, I blame Food52. 

They featured Alice Water's Ratatouille recipe, slightly adapted, in their "Genius Recipes" series (there is some cool stuff there - check it out), during the restaurant's 40th anniversary celebration week and the treatment touched a chord for me. From the picture on the site,it looked: not soupy, not a brown mash, not full of watery zucchini that taste like heated slush - all bad taste memories for me.  

In this preparation, the peppers, onions and (yes) even the zucchini maintain texture, structure and dignity and the flavors of the other vegetables is distinct. This is still true as I eat it this morning (the third day) warmed up, under some scrambled eggs. Finally, the recipe reminded me of pound cake - a pound of tomatoes, a pound of zucchini, a pound of onions, a pound of eggplant, a pound of peppers, plus olive oil, 4-6 cloves of garlic, basil, a pinch of dried chile flakes and salt. Easy to remember. 

Since I used Food52's recipe as is and did not adapt it enough to republish, except to cut the zucchini a little bit larger than the called-for 1/2" dice, I'll refer you to their site for the recipe but will give you some notes in the pictures below, on the preparation.

Preparation Notes & Photos                                                                                                                 
 
The only quibble I have with this recipe is how the quantity of basil is described:
  • 1/2 bunch of basil, tied in a bouquet with kitchen twine + 6 basil leaves, chopped

What is a "bunch of basil"? Small differences likely don't matter but a bunch can be few stems or a fist-full. During summer, especially at farmers markets, basil is plentiful and the bunches I buy are huge. If I purchased a plastic clam shell  package of fresh basil from my local corporate grocery store, it's a much, much smaller amount and may not have been enough. If I'd used half of the giant bunch of basil from the farmers market, I think it would have overwhelmed the dish.
I used yellow and green zucchini, Early Girl tomatoes, 2 small red onions, 1 medium yellow onion,
red Italian sweet peppers and 3 small eggplants and basil
I used this much basil and while the flavor permeates the dish, it doesn't overpower. To the right is the eggplant which is cooked first, caramelized, and then removed to be added back later.
The onions are colored mostly from bringing up the fond after cooking the eggplant with a little (very) color from cooking. I like making a spot for my garlic so that it actually cooks with pans' heat rather than throwing it in to steam with the other ingredients. That's a tip I picked up watching Lidia Bastianich. I used six cloves but it absolutely doesn't overwhelm the dish and cooked it to a very, very pale straw color
I cooked the onions, garlic and chile flakes before I added the basil (a slight departure from the recipe) and then, as the recipe states, added each of the following, cooking for a few minutes before adding the next ingredient: peppers, summer squash and tomatoes. Lastly, the eggplant is returned to the pan and the dish is cooked for 10-15 minutes before the basil is removed and the seasoning adjusted.

Wednesday, August 24, 2011

Spoon Salad: It's Crunch Time

Spoon Salad: this time with cucumber, celery, carrots, scallions, zucchini, red bell pepper, breakfast radishes and snap peas

Spoon Salad?
Spoon salad is my name for a combination of raw vegetables cut up so that you can eat it with a spoon, with a good 'refrigerator life' that I make weekly and mix with, at the time I prepare it, a variety of other vegetables (those that don't store well), herbs, grains, nuts, beans, dairy, meat, fish and/or tofu. The creativity is in how it's dressed and the 'mix-ins'. The base vegetables change somewhat by season. Every once in a while, I'll use it as a base for a speedy saute or stir fry. I just don't get tired of it.

This salad is capital-C CRUNCHY! I love the freshness and the taste. It's filling and wicked good for you. It is also great for developing and improving knife skills. I have tried cutting some vegetables in the food processor but overall, it takes less time to do it by hand and in some cases, using a food processor creates too much liquid. I recommend a small dice (1/4") for carrots or other hard vegetables and 1/3 to 1/2 inch for other less hard vegetables.

If there's a vegetable you want to use and you don't know if will keep for a few days, prepare some and add it to a separate container. Check on it each day. If it gets a little liquid-y in the container, it's probably not a good candidate. If you are considering becoming a Spoon Salad convert, think about how and when you'll use it. Once you've diced up the vegetables, you've pretty much made a commitment and you may want to start by making just a few cups at a time.
 
There really are no rules, but these:
  • The vegetables are cut so that you can eat the salad with a spoon
  • Don't use any 'watery' vegetables - this is a salad that should last in the refrigerator, if stored properly, for up to five days. I've gone as long as seven days with no discernible degradation of appearance or flavor. Anything like tomatoes, seedy cucumbers or other vegetables that are likely to break down quickly should not be included in the 'base' but may be added at the time you assemble it for a meal. One exception is English or Persian cucumbers - they tend to hold up well.
  • Make sure the vegetables are well washed when you start and as dry as possible before you assemble and store the salad - and by that I mean no or very, very little residual water left over from washing when you start to prep and dice the ingredients.
  • It should be very, very colorful
  • Store it in airtight containers - I store mine in several 4-cup plastic containers
You may or may not want to add scallions to your 'base', but I find that onions or shallots (if you wish to use those) should be added as 'mix-ins' at the time you're assembling your meal or dish. It travels well.

Ingredients I Use Include:

Tuesday, August 16, 2011

Carrot Walnut Salad with Walnut Oil and Dijon Vinaigrette

I have nothing against lettuce. I love lettuce, but most of the salads I eat at home are primarily vegetables other than lettuce and this oh-so-simple but oh-so-tasty salad caught my eye. Also, it gave me a opportunity to use the Messermeister julienne-ing thingy I used for the zucchini slaw.

Although you can use all extra-virgin olive oil - or any other salad oil - the walnut oil specified in the recipe is delicious. The recipe calls for 2 tablespoons each of walnut and olive oil but I found that was a little less tart than I prefer. If this dressing is too tart for your taste, add an additional tablespoon of olive or walnut oil. I also thought that it called for more walnuts and a little cumin.

This should be made at least two hours before serving and preferably you can make it the night before. You can also shred the carrots on a box grater but they will be a little wetter and will not take as long to marinate.If you shred them, squeeze out some of the moisture before you dress them. This also cuts down on the time for marination and two hours should suffice.

Recipe: Carrot Walnut Salad with Walnut Oil and Dijon Mustard Vinaigrette

Tuesday, April 5, 2011

Roasted Radishes: Good News/Bad News

"RUN! RUN BEFORE IT'S TOO LATE!
My kingdom for opposable thumbs!  Or legs!"
(Yes, these are the radishes speaking)
Good news: I really liked the greens.

Bad news: Roasted radishes remind me of roasted chunks of zucchini and do not even taste like radishes.

Do not want.

I did some research and pulled the recipe from a trusted source - still trusted - but figure this is a "chacun à son goût" difference of taste.

My advice is, don't throw your radish greens out - sauteing or roasting the greens is a good idea. Leave your radishes in the crisper and eat them raw - or pickle them.  If I ever do this again, I'll crank up the heat and just cook them long enough for some color, sauteing the greens separately - or I'll roast the greens 'til just crispy (they were very good!). The likelihood of me roasting radishes again is - oh - somewhere around exactly "hell no".

If you want to give this a shot, go for it. Believe me, I'd love to find out I was doing this wrong as my love of roasted things knows no bounds. In the mean time, I'm going to dream of sliced breakfast radishes on a baguette spread with sweet butter and sprinkled with sea salt.

Monday, April 4, 2011

Celery Root and Spring Onion Mash with Roasted Garlic


I've nothing against mashed potatoes -- I love them, just far, far too much. I cannot have a potato in my house without cooking it and consuming it (along with its siblings) with obscene quantities of cheese, butter or other dairy products. It's a fact that I can (and do) live with.

I needed something that would stand up (literally and taste-wise) to the jus and gravy from a pot roast (or a Thanksgiving turkey...), like mashed potatoes, but not BE mashed potatoes.  I saw a recipe for a spring onion mash but thought that wouldn't have the structure I needed.  I have been on a bit of a celery root tear and have seen many recipes and restaurant menu dishes over the years for celery root puree and celery root and potato puree. Boiled celery root has (approximately) 1/3 the calories and 1/3 the total carbohydrates of boiled potato (if that matters to you).

What if you cooked some spring onions down with a little salt and olive oil and mixed them with cooked celery root that you'd squeezed the bejesus out of to get rid of a lot of the juice and then mashed them together with roasted garlic?  Would it work? Would it taste good - delicious, even?

Hell, yes!

The first time I made them, I added some marscapone cheese and a tablespoon of butter and extended them with some mashed cannelini beans.  Yeah, you can do that and it's great, but last night I just stuck with the three basics: celery root, spring onions and roasted garlic.

Update: Leeks work too. 

Thursday, March 17, 2011

Celery Root Stock

Whoa.

So I had two celery roots in my crisper and decided to cube and roast them up.  Celery root is the hairless cat of vegetables.  While a hairless cat may be a lovable, sweet kitteh, you kind of have to WANT to love it when you see it in its original form.  You can see a picture of it (celery root, a/k/a celeraic and not a hairless cat), pre-trimming here - thanks to H-bomb's Flickr pic. In fact the celeraic shown in this photo aren't as gnarly looking as some I've seen.
I trimmed and cubed them and was getting ready to dump the decidedly un-lovely trimmings in the compost bin when I thought, "Hey, would this make good stock?".  I heated up some olive oil in my 5-qt. Le Creuset, threw the trimmings in with a pinch of salt and caramelized them a bit. After a while I added a couple of quarts plus some extra of near-boiling water, brought it to a boil, turned it down to a simmer and popped the lid on.  That was about 2 hours ago.


I took it off heat at about 3.5 hours in, removed the schmutz and when it cooled down a little, strained it through a quadruple layer of cheesecloth (I scrubbed the celery root before trimming but there was still some dirt in the nooks and crannies - make sure there are no darker particulates in your stock).  I thought about reducing it but I like the delicate flavor.