Pages

Tuesday, October 25, 2011

Staples: A Pound (Give or Take a Few) of Pickled Padrons

I get a kick out of making pickles. The smell of brine and spices takes me back to college when, during a couple of summers, I worked as seasonal help at a pickle-packing plant during cucumber season when they fresh-packed pickles (as opposed to a long brine). I came home every day smelling like vinegar, dill, garlic and other spices. My mom frequently made me take off my work clothes in the garage and throw them directly into the washing machine before I came into the house. I was -ah- rather pungent smelling and often sticky.

I really love pickles, but it always took me a month after working there to be able to eat them again.

The worst job was sorting the cucumbers. They'd dump  bins of cucumbers onto several conveyor belts and workers, on either side of the belt would sort out any that weren't  the appropriate size or shape - depending on what they would be used for - and throw out the ucky looking cukes and any leaves or stems. The smell wasn't good, but I got used to it. The worst part was staring at a moving conveyor belt for hours at a stretch. When you looked up, you were a little dizzy and anything stationary you looked at appeared to be moving like the conveyor belt. Dumping glass (overturning boxes of glass jars at the start of the production belt to be filled with cucumbers, pickling spices and brine) wasn't bad once you got a rhythm going and adding the pickling spices wasn't too bad either.

This is exactly like the thumb guards I wore.
I think I might still have one, somewhere.
The second worst job after sorting was... Do you know why the first dill pickle's so hard to get out of the jar? Well, that's because one of our jobs was eight workers standing four to a side of a bin filled with cucumber, with the conveyor belt split to run along each side of the bin and after most of the cucumbers had been added to the jars by going through the "shaker" and the pickling spice added, we would shove in one or more cucumbers so that the jar was completely full and the cucumbers tight against the upper shoulders of the jar.

This was hard on the back and the thumbs. After I got used to it, I had thumbs of steel, but my back never acclimated. I also wore thumb guards under my gloves. As summer jobs went, it paid very well. I liked working swing because once the sun went down, the plant cooled off a little. The absolute best job was when you got to drive a fork lift. Whee!

Just a hair short of a pound.
I'm going out of town for a few days and had a surplus of Padrón peppers - Pimientos de Padrón - a generally mild chile used frequently as tapas - quickly and gently fried, then seasoned with salt. To round that out, I had about 8 really small sweet peppers. I knew that I wouldn't get to them before I left and I didn't want them to go to waste. Pickling most vegetables is dead easy and fast, especially if you're making a refrigerator pickle. If you want to make something shelf-stable, make sure you follow the rules regarding canning, else bad things may happen.
This was the last time my face got this close to the pan while cooking the brine.
Vinegar fumes can knock you sideways. Opening a window or turning on your kitchen fan helps,
once the liquid starts to come to a boil.
This brine will work with just about any peppers or other vegetables and the spicing can be adjusted to your own taste. You should let the jar sit in the refrigerator for a week before eating. I'm looking forward to eating these when I come back, in a salad, as a part of another garnish or just for snacking.


RECIPE: PICKLED PEPPERS

Friday, October 21, 2011

Sweet Sunday: Lime Coconut Bars


This is a riff on Mark Bittman's recipe in "How to Cook Everything" called, "Gabriella's Lemon Squares" and while they weren't picture perfect coming out of the pan, they sure did taste good. I love unsweetened, toasted coconut's nutty naturally sweet flavor.


Actually, I think my problems getting them out of the pan could have been solved by using a metal baking pan with square corners and lining it with well-buttered parchment paper as I don't think the Pyrex pan's rounded corners did me any favors. Next time  - and oh my friends, there will definitely be a next time - I won't spread the coconut up the sides as it made cutting the bars more difficult. With the coconut on top, it's easier to start your cuts in the middle of the pan and work out towards the edges. I even think a metal pastry scraper with a straight edge would work well.


The original recipe did not call for zest, but I added that to both the crust and the filling as well as upping the lime juice to 1/3 cup.


Oh - and let's just get this out of the way. I know some of you have already thought of this and those who haven't, I want to share this with you because I had this song in my head the entire time I was cooking as well as the time it took to write this post!


... aaaaaand you're welcome!

RECIPE: LIME COCONUT BARS

Thursday, October 20, 2011

Green Bean and Almond Soup and Notes on Vegetable Stock


This recipe was part of my "cook the pantry and the crisper" effort this week. After making two cakes with almond flour, I had a surplus. I also had a just-passed-prime, but still in great shape, pound of green beans. Searching "green beans" and almond meal". I found this recipe on Clotilde Dusoulier's "Chocolate & Zucchini" site. Ms. Dusoulier adapted this recipe from "Breakfast, Lunch, Tea: The Many Little Meals of Rose Bakery".

Although not as pristine as when i bought them, these were super crunchy and fresh tasting.
It's a pureed soup of green beans, aromatics and vegetable stock thickened with ground almonds.  Green beans and almonds taste great together and using ground almonds as a thickener is a win for the gluten-intolerant. The resulting texture isn't silky smooth as most pureed soups, but the combination of flavors is very good. It's not a BIG! GIGANTIC! flavor-buster soup, but not everything has to be - just great ingredients and a lovely flavor. I ate this with salad and cheese toast.

In my version, I use leeks instead of onions and celery with no carrots (as there were none in the crisper). I prefer leeks over onions in a lot of soups and love the flavor. Leeks can take some cleaning, as there can be a lot of dirt in between the layers but I generally clean dirt of of the outside, trim off the ends, and the fibrous dark green parts (which I save for stock), cut them as called for and then wash them by soaking and swishing them around in cold water, letting them sit  for a couple of minutes to let the dirt drop to the bottom of the bowl then drying them off in a salad spinner. This method is easy and fast.
In most instances, I trim and cut up my leeks and then I wash them.
Just remember to clean your board and knife before moving on to the next vegetable.

Vegetable Stock: I cooked both wild rice and barley this week and used the left-over water as a basis for vegetable stock. Water in which I've cooked chickpeas also make a really tasty starter for stock. To that I added the green tops and trimmings from the leeks, some celery leaves, a bay leaf and a few stems of thyme. During the week I throw appropriate (where the veg isn't too strong-flavored or bitter and would overpower the taste) trimmings into a freezer bag and stuff it in the freezer. I don't use them if they've been in the freezer over two weeks.

The cooking water from many beans and grains - if you don't use it in the dish for which you cooked them - make a good base, too. White or light-colored beans - especially cannellini - tend to be good. I don't use bean cooking water when the resulting product is strongly colored or too cloudy. I let the left over water from the barley sit for about a half an hour and let the starch particles sink to the bottom while pouring off the less-cloudy water.

Vegetable Stock Guidelines: Heat up a big pot on the stove on medium-high. Add a couple of tablespoons of olive oil. Throw in the left-over vegetable trimmings that you have cut up roughly (the smaller the better) and a couple of pinches of salt. Depending on your preference, cook them without coloring them or caramelize them a little, adjusting the heat as necessary, along with 1 or two smashed cloves of garlic. Add a bay leaf, a few pepper corns, a tablespoon of tomato paste (if you have some) and cook for a few more minutes. Add half-dozen sprigs of parsley and a few sprigs of other herbs (if you have them). Add the left-over bean or grain cooking water, or just water to a ratio that works for the amount of vegetables and trimmings. Commonly, a pound of vegetables to a gallon of water, but adjust down (or up) depending on your vegetables.

Bring the pot to a boil, turn the heat down and cover so that the liquid comes to  a medium simmer. Let this cook, covered, for 45 minutes to 1 hour. It doesn't help this to cook it longer and by 1 hour, you've extracted the maximum flavor from the vegetables. Take off the heat and allow the stock to cool to lukewarm. Set a large strainer over a bowl and ladle the solids into the strainer (pushing down on them a little to extract so that you can pick up the pot and pour the remainder of the liquid through the strainer. Push down on the remaining solids a little to exact any extra liquid.  Allow this to sit for an hour or until completely cool. Pour this liquid, making sure that any sediment remains at the bottom of the bowl, through a double-layer of cheesecloth.  Cover and store in refrigerator for 2 days or in an airtight container (or multiple containers, in smaller quantities) in the freezer for a couple of months.
(LEFT) take the pan off heat when the almond meal is about this color. Have a plate ready (to cool it down)
because it will continue to cook. (RIGHT) Toasted and un-toasted almond meal comparison.
RECIPE: GREEN BEAN and ALMOND SOUP

Wednesday, October 19, 2011

Sweet Sunday: Whole Wheat Apple Muffins and Camera Advice

So, on my second weekend of cooking something dessert-y for my friend to take to her church, I was scrambling a little to get them made and cooled -- all the while shooting lovely (or as lovely as I can manage), informative pictures.  Except...

...when I checked on the images, there was nothing. I'd forgotten to take the card out of my laptop and put it back in the camera. Yes, the display clearly shows, a "NO CARD" message, but once I got my settings for the pictures, I wasn't looking at the display. What's the lesson?
Stand-in apples - taken this week as I made the apple muffins a week ago last Sunday.
There is a setting to enable notification in the viewfinder - big and bright, flashing, yellow CARD, that I have since changed from "Disabled" to "Enabled". You might want to check that out on your own camera.

Fortunately, I had set a couple of the muffins aside for Lynn and was able to memorialize the muffin. For me, an inconvenience - these aren't professional photo shoots - just a pain in the hiney.
Anyway, these are very good muffins that I made pretty much as specified by Deb Perelman over at Smitten Kitchen. The only change I made was to, right after the muffins came out, sprinkle yet a little more brown sugar on top. A few people mentioned that they liked the extra crunch. As Mr. Perelman states in the recipe (which she adapted), the original recipe says you'll get a dozen, but you're likely to get more, from a standard-size muffin tin - I got 18.

Apples! There are glorious apples in the market and a Granny Smith isn't your only option for baking when you want an apple that will hold its form. The picture at the top of this post has Northern Spy, Fameuse and Skaar, but the apples I used for these muffins were, per the farmer, "mystery" apples and holy buckets they were good eating AND good bakers.

Beyond the addition of the additional brown sugar after the muffins came out of the oven, I did not change this recipe and so click the link below to go to Smitten Kitchen for the recipe.

RECIPE: WHOLE WHEAT APPLE MUFFINS at SMITTEN KITCHEN
Makes 12 - 18 muffins.

Saturday, October 15, 2011

Lamb Kefta Tagine with Tomatoes and Couscous

I meant to make this last week but ran out of time and stuck the lamb back in the freezer. A friend came to visit this weekend from afar - 17 hour plane ride. We had a lot of catching up to do and I didn't want to be fussing around. I don't multi-task all that well: I can cook a lot or I can talk a lot but I can't do both and I wanted to do the latter but have a good meal. I made this in about an hour, headed down to the airport and when we got back, reheated it, made the couscous, heated up some pita bread in the oven, made a simple salad of greens and vinaigrette and dinner was ready in about 20 minutes.


This is a dinner that you can cook in parts - sauce first - and store it before making the meatballs. It was eaten fast enough that I didn't have any left over to freeze, but I'm guessing it would store very well.


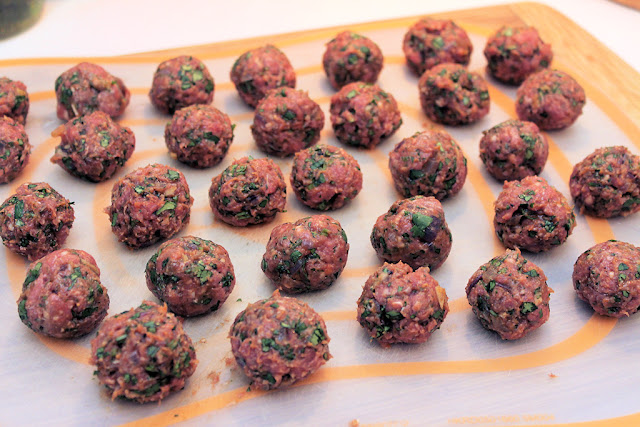
The only part that requires about 20 minutes of continuous effort is making the meatballs. The original recipe specified that the meatballs be the size of large cherries. I made mine about 1" in diameter and added an egg - also not called-for in the original recipe. I used a small ice cream scoop to portion the meatballs. This recipe is a definite keeper and when tomatoes aren't in season, canned will do just fine.

RECIPE: LAMB KEFTA TAGINE WITH TOMATOES and COUSCOUS

Friday, October 14, 2011

Friday Dinner: Baked Ziti with Tomato, Mozzarella and Sausage

 The original recipe says that it will serve 4, but you can easily cut it in half to serve that many, especially if you extend it by adding some extra meat (left-over pot roast from last week), as we did.

Lynn found this recipe and we both like it for several reasons: mixing the seasoned ricotta with the cooked pasta - while the pasta is still warm, before assembling the remainder of the dish distributes the ricotta mixture beautifully throughout, it's not overly sauce-y, and it tastes great when you augment the sausage with leftover meat. In this case left-over roast beef, but we've also used pork.


Oh yes - and it's really delicious.

 If you assemble it before-hand (over an hour or more before the final baking), I recommend making it saucy-er as the pasta will absorb a good deal of the liquids. If you're planning on sticking it in the oven right after assembly, you're good to go.
Lynn hasn't added the mountain o'mozzarella yet and you can see how much there is in the pan already!
It doesn't take very long to cook once you've assembled it, it's just a matter of heating everything up and melting the cheese.


RECIPE: BAKED ZITI with TOMATO MOZZARELLA, SAUSAGE and ROAST BEEF

Thursday, October 13, 2011

Sweet Sunday: Orange Ginger Torte: A Long Post for a Short Recipe

Murcott Tangerines
!WARNING!: this is a long post. You can skip down to the jump for the recipe. Or read on for:
  1. How I will manage to make baked goods and desserts on a weekly basis without guilt; and
  2. How I tussled through two iterations of possibly one of the shortest recipes other than, "Apple: wash, eat".
Torte Version #2 Plated: Made with Murcott tangerines. The only sugar I had was an organic unrefined,
unbleached, cane sugar which produced a deeply browned exterior. It also photographed a little darker than it actually looked.

Consider the following:
  • I am much more confident in my savory cooking than in baking or desserts and I would like more practice, but... 
  • I should not have left-over desserts or baked goods, hanging out in my house and calling to me like the Sirens
What to do? Until now, I'd only make desserts for a dinner party or other special occasion and send left-overs home with guests. A few weeks ago I had an ah-ha moment: the church a friend of mine attends serves food after services. A few years ago, I sent a test batch of vegan, chai cupcakes along with her (they liked them). A few weeks ago I asked her if I could make a dessert at the end of the week and send everything with her except for a serving for me to taste (and one for her). Eureka!. Now we have "Sweet Sunday".
Torte Version #1 Plated: This was made with regular white sugar and glazed with a thin mixture of
orange zest, orange juice and sugar.
Unlike savory cooking where I'm generally fearless and understand what's going on and why something works (or doesn't), I don't have that deep experience with desserts and baking. This means more copious head notes in my posts (as if I weren't wordy already!) which I hope are helpful for at least some who read. If it's all old hat to you, just nip on down to the jump link and go right to the recipe.
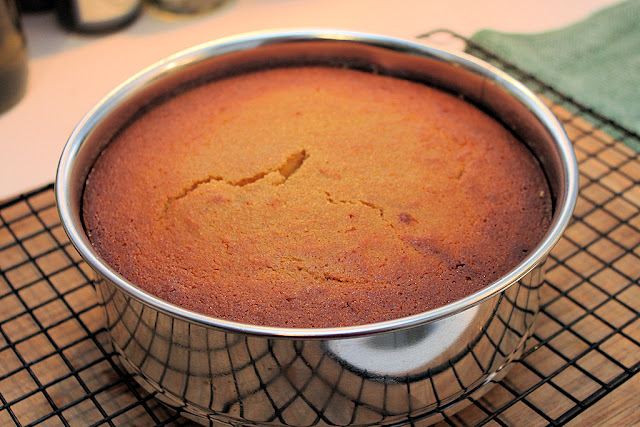
Torte #1 after an hour of baking. Looks fine on the outside, but the interior was mushy, still.

For the first round of Sweet Sunday, I made an orange ginger torte which has a very sexy, seductive aroma and taste. It has a short list of ingredients: oranges, eggs, sugar, almond meal, ginger (both fresh and candied) and baking powder. I ended up making it twice. The first time the end result, once I got through all of the trials and tribulations, tasted good, but I couldn't post it until I addressed the issues and questions I had or at the very least understood why I ran into problems and made it a second time with adjustments, and I will definitely make it again. I'll note this again in the recipe, but I really think this torte tastes better after the first day and on the third day it was even better - just wrap tightly and store in the refrigerator.

#1: How BIG is Small? ...Because Size Does Matter
  • After I made it the first time the first thing I came to learn was that your idea of a small, medium or large orange may differ from mine and this is a perfect example of why weight is a better way to measure, especially in baking. The recipe called for 2 large or 3 small oranges. I had several Moro blood oranges and 3 of them that I considered small. The cake took two hours to fully cook instead of the one called for in the recipe. After the first hour, the insides were like oatmeal. I emailed the author (Clotilde Dusoulier of "Chocolate & Zucchini" fame - a very good blog, full of delicious, interesting recipes and good information) and she was gracious enough to update the recipe with the weight (1 1/3 lbs for the oranges) and also give a really useful description of how the crumb should appear in the post's comments. She has been blogging for years and her site and recipes are very popular - for good reason -  so there are generally many comments per post. Not all bloggers respond to questions, but she does - and did respond to mine even though the original post was from 2004!
#2 The Right Citrus for the Job
  • I did some research and found that most of the similar recipes were called "Clementine Cake"  and generally called for Clementine oranges (a mandarin hybrid).  Also, I think blood oranges aren't my preferred choice for this torte. They often are a bit dear and I think the special taste and aroma qualities of a blood orange is lost in baking - at least in this torte. When you get your hands on a good blood orange, it is a wonder and not just for the beautifully hued flesh and peel. I can find essence of roses and other floral aromas in the flesh and they are wonderfully juicy.
    Torte Version #2: The recipe from which I started called for a topping of pearl sugar combined with lemon juice and zest. I opted for a glaze made with powdered sugar, orange juice and zest, topped with toasted almonds.

    I think this cake tastes better using an orange with less pith. Less pith=larger ratio of flesh and outside skin (zest) to pith. The second time around, I used 1 1/4 lbs of Murcott tangerines. Murcott tangerines are marketed in some areas as "Honey Tangerines" and are sometimes called Murcott Mandarins (see: UCR College of Natural and Agricultural Science's Citrus Variety Collection- I love this reference site). They are delicious to eat with a bright, sweet flavor and a great aroma. I rarely encounter a seed but cut mine in half horizontally to look for any before I pureed them. I think any thin-skinned mandarin or tangerine with great taste and a thin pith would work just fine.
#3 What is it supposed to look like?
  • Ms. Dusoulier's comment, "...one thing I want to note is that this cake remains a very moist one, even when fully baked. The crumb should feel like it's been soaked in syrup" was so helpful because I wasn't sure. I know tortes made with nut meals or flours will not have the same kind of crumb as a cake or quick bread, but I really didn't know what to expect. Her comment made perfect sense to me and I knew, for my second go-round that it was properly finished.
#4 One last thing - I swear it's the last note.
  • The first time I made it I used a coarse-ground almond meal and the second time, I used a fine-ground almond meal - more flour-like. I didn't see an appreciable difference so use what you have or can get your hands on. I used Bob's Red Mill almond meal both times. 
On to the...
RECIPE: ORANGE GINGER TORTE

Friday, October 7, 2011

Friday Dinner: Pot Roast, Mashed Potatoes, Garlic Green Beans and Brussels Sprout Salad


...and gravy - the most beautiful dark, rich and silky gravy I've seen in quite a while. Individually and together Lynn (my fearless Friday night cooking confederate), and I have made many a pot roast, other braised beast or stew. We KNOW our braised meats and stews - the aromatics, the herbs, the liquids, the sauce and layering of flavors and this last Friday's pot roast was one for the hall o'fame. Some recipes call for chuck OR meat from the round, but we think that nothing beats meat from the chuck for a pot roast. It can be boneless or bone-in.
From: Wikipedia


The Friday before we cooked this meal, we were out to dinner with some friends from Florida and I had a side of green beans. "Okay, green beans. And...?" Both of us add pressed garlic to the last stage of cooking, tossing it with the beans - they are always damned good, but these green beans had tiny flecks of garlic all over each bean. They wore a dusting of a fine brunoise of garlic that absolutely made its presence known, but didn't get in the way of the bean flavor. A fine brunoise is a cut that is 1/16" x 1/16" of an inch. This, rather than a paste, makes total bean coverage possible. They tasted fantastic so we did the same to our beans.

I used 2 medium cloves of garlic for the amount of beans we prepared. Was it worth the effort? I'm a very happy camper when I'm holding a chef's knife, slicing, dicing, mincing or brunoise-ing my way through a big pile of produce so I'm inclined to pick up a knife in any case, but yeah, it was worth it. Any time you want this kind of garlic coverage, this is the way to go. I love my 9" chef's knife but this is a job for a smaller, very sharp (of course!) knife.
Shredded (raw) brussels sprouts, sliced, toasted almonds, garlic for the green beans
cut in a fine brunoise, and a paste of 1 clove of garlic for the vinaigrette
 Raw Brussels sprout salad. I love b-sprouts and have cooked them every which way so we figured we'd give a raw salad a shot. Excellent idea! Mustard-y vinaigrette with some aged cheese grated (with a microplane) into the dressing and some extra tossed in at service. Next time, we're going to add some tart apple. For you  Brussels sprouts naysayers out there, raw b-sprouts are quite mild tasting.

RECIPES:
  • Pot Roast
  • Gravy
  • Mashed Potatoes
  • Garlic Green Beans with Toasted Almonds
  • Shredded Raw Brussels Sprout Salad with Mustard Vinaigrette and Aged Cheese

Saturday, October 1, 2011

Saturday Breakfast: Bacon, Tomato and Avocado Breakfast Sandwich

Nothin' special here - except for the taste: toasted English muffin, smashed avocado, sliced Early Girl tomatoes and bacon. Grapes on the side.