Pages

Tuesday, August 30, 2011

Ratatouille: Or, How I May Be Losing My "I Hate Zucchini" Membership Card

First it was Sautéed Julienned Zucchini. Then it was Zucchini Tomato Slaw with Tennessee Mustard Dressing. Now, Ratatouille. What is wrong with me? I can understand the first two - the first is flash sautéed and the second uncooked with the oh-so-offensive seed cores unused, but ratatouille is, by definition cooked, and for quite a while. For this, I blame Food52. 

They featured Alice Water's Ratatouille recipe, slightly adapted, in their "Genius Recipes" series (there is some cool stuff there - check it out), during the restaurant's 40th anniversary celebration week and the treatment touched a chord for me. From the picture on the site,it looked: not soupy, not a brown mash, not full of watery zucchini that taste like heated slush - all bad taste memories for me.  

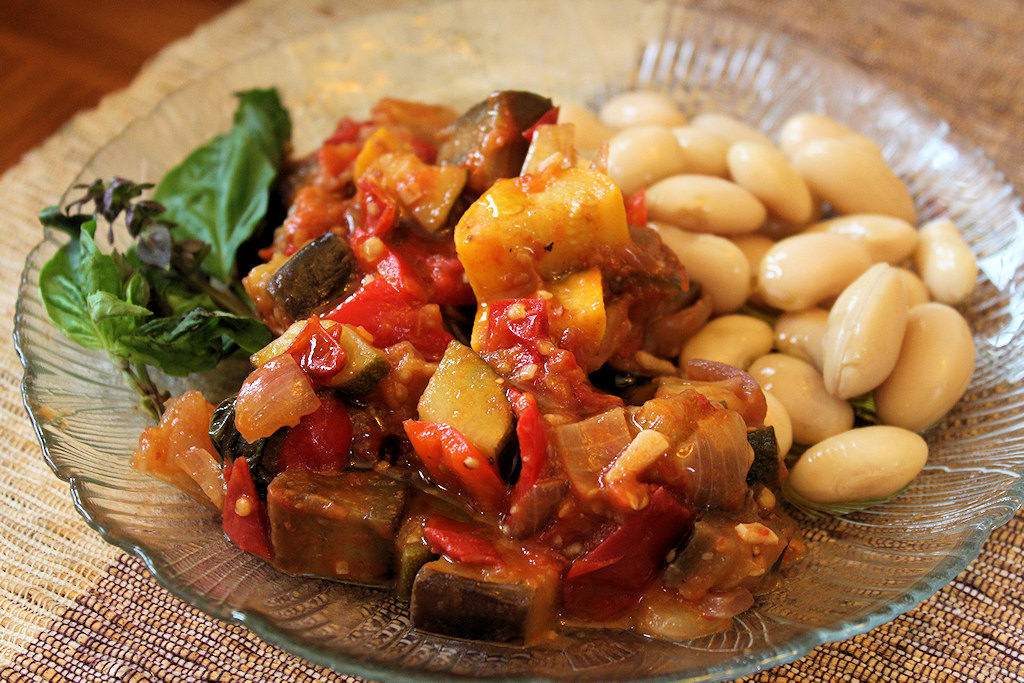
In this preparation, the peppers, onions and (yes) even the zucchini maintain texture, structure and dignity and the flavors of the other vegetables is distinct. This is still true as I eat it this morning (the third day) warmed up, under some scrambled eggs. Finally, the recipe reminded me of pound cake - a pound of tomatoes, a pound of zucchini, a pound of onions, a pound of eggplant, a pound of peppers, plus olive oil, 4-6 cloves of garlic, basil, a pinch of dried chile flakes and salt. Easy to remember. 

Since I used Food52's recipe as is and did not adapt it enough to republish, except to cut the zucchini a little bit larger than the called-for 1/2" dice, I'll refer you to their site for the recipe but will give you some notes in the pictures below, on the preparation.

Preparation Notes & Photos                                                                                                                 
 
The only quibble I have with this recipe is how the quantity of basil is described:
  • 1/2 bunch of basil, tied in a bouquet with kitchen twine + 6 basil leaves, chopped

What is a "bunch of basil"? Small differences likely don't matter but a bunch can be few stems or a fist-full. During summer, especially at farmers markets, basil is plentiful and the bunches I buy are huge. If I purchased a plastic clam shell  package of fresh basil from my local corporate grocery store, it's a much, much smaller amount and may not have been enough. If I'd used half of the giant bunch of basil from the farmers market, I think it would have overwhelmed the dish.
I used yellow and green zucchini, Early Girl tomatoes, 2 small red onions, 1 medium yellow onion,
red Italian sweet peppers and 3 small eggplants and basil
I used this much basil and while the flavor permeates the dish, it doesn't overpower. To the right is the eggplant which is cooked first, caramelized, and then removed to be added back later.
The onions are colored mostly from bringing up the fond after cooking the eggplant with a little (very) color from cooking. I like making a spot for my garlic so that it actually cooks with pans' heat rather than throwing it in to steam with the other ingredients. That's a tip I picked up watching Lidia Bastianich. I used six cloves but it absolutely doesn't overwhelm the dish and cooked it to a very, very pale straw color
I cooked the onions, garlic and chile flakes before I added the basil (a slight departure from the recipe) and then, as the recipe states, added each of the following, cooking for a few minutes before adding the next ingredient: peppers, summer squash and tomatoes. Lastly, the eggplant is returned to the pan and the dish is cooked for 10-15 minutes before the basil is removed and the seasoning adjusted.

Monday, August 29, 2011

Chile Verde

Sometimes it's hard pretending that it's summer and I should cook summer meals when I look out the window in the evening and see fog blowing up my street, my visibility is limited to two blocks and the wind is howling.  Okay I know, "Wah, wah, wah!" </end bitch session> Welcome to summer in San Francisco. At least in my neighborhood.

Last week I made chile verde and appreciated the warmth. Actually, I made it twice. The first time (a small batch with chicken) it was wimpy with absolutely zero heat. I used four jalapenos and I might as well have left them out. Coincidentally, a few days after I made it, I saw this article on CookThink. Demand for chiles has resulted in prettier, shipping friendly, but milder jalapenos.
"To meet the demand, jalapeno breeding has promoted varieties that are flawlessly pretty, easy to ship and easier to grow in cooler climates. Jalapenos used to be grown mostly in the high deserts of New Mexico, Arizona, and Northern Chihuahua and Sonora, Mexico. Hot, dry climates promote the production of capsaicin, the chemical that makes a hot pepper hot. Now, some varieties can be grown in wetter, cooler climates that don’t create enough heat for a spicy chile pepper."
Furthermore, the author provides information on varieties to look for if you want hotter or milder chiles. When I'm cooking and using chiles, I'll taste each one to get a sense of its heat - I should have followed my own advice on my first batch. Chiles are hotter at the stem end than the tip so I usually go for the middle. The ribs, core and seeds of the chile is where the majority of the heat is so if you taste the flesh and it's kinda wimpy, just trim off the stem and use the rest of the chile.

When I cook with chiles, my goal is to find the balance between enough heat without losing the taste of the other ingredients and the dish, overall.

Online Chile Resources:
Cook's Thesaurus: Fresh Chiles and Dried Chiles
Wikipedia: Scoville Scale (common method for categorizing a chile's heat)

I'm declaring my love for tomatillos. There, I said it.
Tomatillos (unrelated to tomatoes) are a fruit, related to the Cape Gooseberry. Green tomatillos are more tart than the purple-ish varieties. Raw, the taste of a green tomatillo is reminiscent of a Granny Smith apple. Tomatillos can be used raw or cooked. To prepare, remove the paper husks and rinse them in warm water to remove (most of) the sticky stuff which can be somewhat bitter. You don't have to completely remove it, so don't fret if there still some on the surface of the tomatillo.
Out of the broiler.
Sauce ingredients ready for the blender.
After blending.

Recipe: Chile Verde

Wednesday, August 24, 2011

Spoon Salad, Chickpeas and Wild Rice with Yogurt Sesame Sauce


A few years ago, I landed on Heidi Swanson's blog (101 Cookbooks) when I was looking for instruction on how to make yogurt and have found inspiration there, and in reading her cookbooks (Super Natural Cooking and Super Natural Every Day) ever since. Her focus, is on "...natural, whole foods and ingredients - vegetarian recipes that are good for you, with the occasional sweet treat".

At the time I stumbled across her blog I knew I wanted to maintain my membership in the "I eat meat" club, but wanted to cut back and focus on produce and whole grains as the majority of what I eat. I was inspired by not so much the main part of the dish (which looks delicious), but the dressing in her post: Sesame Yogurt Pasta Salad. In turn, Ms. Swanson was inspired by one of Peter Berley's recipes in his book.

I've written on Spoon Salad previously - a combination of raw vegetables cut up so that you can eat it with a spoon - with a good 'refrigerator life' that I make on a weekly basis and mix with a variety of other vegetables, herbs, grains, nuts, beans, dairy, meat, fish and/or tofu. The creativity is in the dressings and 'mix-ins'. The base vegetables change somewhat by season. Every once in a while, I'll use it as a base for a speedy saute or stir fry. I just don't get tired of it.

I had Spoon Salad in the refrigerator along with cooked chickpeas and wild rice and enough 'mix-ins' (avocado and cilantro) to make a great lunch, and enough leftover dressing to take to my friend Lynn's house the next day as a dip for sesame crackers.

RECIPE: SPOON SALAD, CHICKPEAS, WILD RICE & SESAME YOGURT TAHINI SAUCE

Spoon Salad: It's Crunch Time

Spoon Salad: this time with cucumber, celery, carrots, scallions, zucchini, red bell pepper, breakfast radishes and snap peas

Spoon Salad?
Spoon salad is my name for a combination of raw vegetables cut up so that you can eat it with a spoon, with a good 'refrigerator life' that I make weekly and mix with, at the time I prepare it, a variety of other vegetables (those that don't store well), herbs, grains, nuts, beans, dairy, meat, fish and/or tofu. The creativity is in how it's dressed and the 'mix-ins'. The base vegetables change somewhat by season. Every once in a while, I'll use it as a base for a speedy saute or stir fry. I just don't get tired of it.

This salad is capital-C CRUNCHY! I love the freshness and the taste. It's filling and wicked good for you. It is also great for developing and improving knife skills. I have tried cutting some vegetables in the food processor but overall, it takes less time to do it by hand and in some cases, using a food processor creates too much liquid. I recommend a small dice (1/4") for carrots or other hard vegetables and 1/3 to 1/2 inch for other less hard vegetables.

If there's a vegetable you want to use and you don't know if will keep for a few days, prepare some and add it to a separate container. Check on it each day. If it gets a little liquid-y in the container, it's probably not a good candidate. If you are considering becoming a Spoon Salad convert, think about how and when you'll use it. Once you've diced up the vegetables, you've pretty much made a commitment and you may want to start by making just a few cups at a time.
 
There really are no rules, but these:
  • The vegetables are cut so that you can eat the salad with a spoon
  • Don't use any 'watery' vegetables - this is a salad that should last in the refrigerator, if stored properly, for up to five days. I've gone as long as seven days with no discernible degradation of appearance or flavor. Anything like tomatoes, seedy cucumbers or other vegetables that are likely to break down quickly should not be included in the 'base' but may be added at the time you assemble it for a meal. One exception is English or Persian cucumbers - they tend to hold up well.
  • Make sure the vegetables are well washed when you start and as dry as possible before you assemble and store the salad - and by that I mean no or very, very little residual water left over from washing when you start to prep and dice the ingredients.
  • It should be very, very colorful
  • Store it in airtight containers - I store mine in several 4-cup plastic containers
You may or may not want to add scallions to your 'base', but I find that onions or shallots (if you wish to use those) should be added as 'mix-ins' at the time you're assembling your meal or dish. It travels well.

Ingredients I Use Include:

Saturday, August 20, 2011

Friday Dinner: Flank Steak with Chimichurri Sauce, Tomato Feta Salad, Mexican Corn and Grilled Focaccia

Friday dinner with Lynn, my cooking partner in (delicious) crime. I love cooking slow - layering ingredients where the application of heat creates new flavors, but sometimes... hot, fast and easy is good, too. One of the best parts of this dinner was piling a little of the tomato salad and feta on the grilled bread (that had been rubbed with a cut clove of garlic and brushed with a little olive oil), then drizzling it with a dollup of  chimichurri sauce. That combination could be a meal unto itself.

Good corn needs nothing more than butter (and I can even forego that), a little salt and pepper but I'd never had Mexican "street corn" and wanted to try it. "Elote" is the word for corn on the cob and in most areas (some serve it cut off the cob) it is seasoned with crema (sour cream or mayonnaise may be substituted), lime, queso anejo (aged cheese, usually Cotija or Chihuahua) and chile powder.

Finally, a variety of halved sweet cherry and grape tomatoes, red onion and parsley left to macerate in the refrigerator for an hour then dressed with just a little olive oil and garnished with crumbled barrel-aged feta cheese.

Simple - grill the flank steak. One of the cardinal rules of cooking a piece of meat on the grill is to salt it and another is, don't screw it up.

Flank steak is both easy and hard. One end is generally flat, often about 3/4 " thick and the other is thicker - up to 1 1/2 - 2", sloping down to an inch or so Not the perfect cut for a crowd that all likes rare or medium rare, but good for a mix of the two. It's easy to overcook and this is a situation where an instant read thermometer can be your BFF.

The best way I know to grill a flank steak is to sear it fast on each side over hot coals (2-3 minutes a side and make sure the flank steak has been out of the refrigerator so it's not cold) and then let it cook on the cool side of the grill for 3-4 minutes.
Left: Areas, in descending order of thickness. Right: Where the cow keeps the flank steak (Wikipedia)


Yeah, I got a little overzealous grilling these and about half of them were pretty aggressively 'browned' (and that's being kind). Thank you Lynn, for scraping and making them edible.
RECIPES:
  Grilled Flank Steak
  Chimichurri Sauce
  Mexican Street Corn
  Tomato and Red Onion Salad with Feta
  Grilled Focaccia 

Tuesday, August 16, 2011

Carrot Walnut Salad with Walnut Oil and Dijon Vinaigrette

I have nothing against lettuce. I love lettuce, but most of the salads I eat at home are primarily vegetables other than lettuce and this oh-so-simple but oh-so-tasty salad caught my eye. Also, it gave me a opportunity to use the Messermeister julienne-ing thingy I used for the zucchini slaw.

Although you can use all extra-virgin olive oil - or any other salad oil - the walnut oil specified in the recipe is delicious. The recipe calls for 2 tablespoons each of walnut and olive oil but I found that was a little less tart than I prefer. If this dressing is too tart for your taste, add an additional tablespoon of olive or walnut oil. I also thought that it called for more walnuts and a little cumin.

This should be made at least two hours before serving and preferably you can make it the night before. You can also shred the carrots on a box grater but they will be a little wetter and will not take as long to marinate.If you shred them, squeeze out some of the moisture before you dress them. This also cuts down on the time for marination and two hours should suffice.

Recipe: Carrot Walnut Salad with Walnut Oil and Dijon Mustard Vinaigrette

Infused Spirits and Shrubs Part 2: Shrubs Final

Shrubs: blackberry, mango and raspberry
In an earlier post on Infused Spirits and Shrubs (Part 1) I wrote about the history of shrubs. I never did get around to the strawberry or lemon, but decided to add mango, instead. This morning, I was crouched down in front of my lower pantry cupboard swirling seven one-quart mason jars filled with various fruits and vodka (still infusing) and decided it was high-time to strain and bottle my shrubs. I made three shrubs: blackberry, mango and raspberry. Each was a combination of fruit, sugar and apple cider vinegar in (near) equal amounts. The resulting syrup should be both sweet and tart, but neither of those characteristics should overpower the fruit. The thing that I really like about drinks made with a fruit shrub is that the vinegar gives drinks you make a quality of effervescence without bubbles - if that makes any sense. I am not a fan of sweet drinks so the tart quality of this syrup makes  me very happy. Of the three that I made, the blackberry has the least fruity character, but it is still very good. The mango and raspberry are absolute flavor home runs.

I didn't strain any of the three to be crystal clear (especially the mango, which is quite fibrous anyway), but I put each mixture through a fine mesh strainer and then through a double-layer of cheese cloth before bottling.
Straining the raspberry shrub: the remaining solids, while a wee bit seed-y, tasted good mixed into yogurt.
blackberry shrub, basil and lime cooler

Recipes: Fruit Shrub Syrup & Blackberry Shrub, Lime and Basil Cooler

Monday, August 8, 2011

Baked Corn Pudding - Version 2: Updated and Improved

 My original post can be found here: Baked Corn Pudding: Simple and Delicious. It was my second post but it was stuck there in February when fresh corn isn't an in-season commodity for most of us. I made it on Saturday, but changed it slightly, including my approach to the seasoning. Is it worth getting excited over changes to a recipe that has just ONE main ingredient? Oh, hell yes!
Here are the changes:
  1. For every three (or four) ears that you grate, cut the kernels off of the fourth (but save it to grate any extra corn-liquid).This dish is delicious when all of the ears are grated but even better with some whole kernels.
  2. Season conservatively and taste. By that I mean start with a small pinch of salt, combine thoroughly with the corn and taste. If that's not enough, add another, combine and taste. Go very easy on the salt. For this batch, I used two small pinches of kosher salt (for a net product of approximately 2 cups of unbaked corn - it was perfect. The same goes for the pepper.
  3. The butter that you use to top it should be unsalted, chilled and cut into tiny cubes - this helps cut down on the amount of butter in the dish. I used 1 teaspoon for each of the ramekins pictured, below. Using less butter has no negative impact on this dish.
Another thing that's very important is that you need a minimum depth of two- and up to three (-ish)  inches of unbaked product in whatever container you use to cook the corn. You need to bake it long enough to get at least a little brown, but not so long that it dries out. It's  more important that the corn pudding is moist than completely browned on top. I started checking these after 25 minutes and ultimately baked them for 35 minutes. There should be some liquid bubbling around the outside and the middle should be moist, but not runny.

The ramekins pictured below are 1 cup (8 fl. oz), with a depth of 2" at the inside rim.
On the left, about 1 teaspoon small dice of chilled butter scattered over the surface. You could use more butter I guess, but I think too much butter detracts from the corn flavor. I placed the ramekins on a baking sheet. If you are making a larger quantity and use a single oven-proof container, there's no need for the baking sheet.
Recipe: Corn Pudding (v2)